In the early morning kitchen Miss Mouse grinds the coffee for the family.
Tuesday, July 30, 2019
Thursday, July 25, 2019
Sunday, July 21, 2019
The Mice have a new hanging plant! Every Mouse House needs some greenery! I'll show how I make miniature plants.
These are the things I use........
hole punch - it's heart shaped.
nail clippers - that are only used to cut wire!
containers for plants - I made the baskets, the little wooden bowls are from Hobby Lobby. You could use what you have, tooth paste lids, thimbles, jar caps.....
tea leaves - to use as dirt
tooth picks - for stirring glue and tea leaves together
Tacky glue - for gluing....
nail polish - I used the blue to paint the wooden bowls, if you want an enamel container. The clear polish is to paint the leaves.
brown paint - used to paint the wire (stems) of the plant if you choose.
green paper - for leaves. (got this in the scrap book department at Hobby Lobby)
floral wire - for plant stems
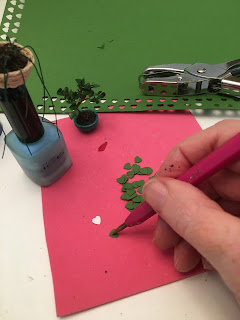
stylus - for shaping leaves
craft foam - to use as a surface on which to shape leaves
Oh, and also some tweezers to pick up the leaves with while gluing. I forgot them in the photo.
There's a little bonsai tree in the picture behind the hole punch
Here we go...
Cut some wire to make the plant stems. Twist the wire together and shape to fit into your chosen container.
Mix up some tea leaves with tacky glue to make "dirt" and secure your wire stems into the container with it.
Let that dry while you punch out a bunch of leaves with the heart shaped hole punch. Then shape the leaves by using the stylus to press a the leaves into the craft foam to cup them a bit.
Now, coat the wire stems of your plant with some tacky glue. This will help the leaves to stick more easily later.
Use the tweezers to pick up the leaves by the pointed tip, then dip the top of each heart shaped leaf into some tacky glue and apply them one at a time to the stems. If the glue sits for a few minutes to firm up it sticks more easily.
I hold the plant by the wire stems while I glue the leaves on. That makes it easy to rotate the plant to see it from all angles. Then, when I have a nicely shaped plant, I clip the wires off with the nail clippers and add a leaf to each wire tip. The last thing I do is dab some clear nail polish on each leaf, it makes them shine and helps adhere the leaves to the stem.
I made a macrame hanger for this plant but they are cute just sitting on a mini table as well.
Thanks for visiting!
Saturday, July 13, 2019
Miss Mouse is mending. Oh dear, has she pricked her finger? But no worries, her fabric is red. She has all of her sewing supplies stored in her Victorian sewing basket that she's able to move around easily from room to room in the Yellow Mouse House.
This basket was made because my daughter believed in me. I wasn't so sure it would be possible, but I did it and the lid even opens!
Constructing it took several days. I used floral wire, linen cord, paint and glue. The above picture is of the early stages. I based Miss Mouses basket on a photo of a real Victorian Basket
Isn't that "real" basket just beautiful.
Miss Mouses sewing basket stands about 4 inches tall. Once I had everything assembled, I painted the entire basket with several thin coats of white paint to give it a painted wicker look. Thanks for visiting!
Tuesday, July 2, 2019
New tea towels for mother mouse. I made these tea towels with linen or plain weave fabric that I found in my stash of old fabric. I cut out the little towels being careful to follow the weave of the fabric. The edges of the towel are frayed by several strands, no hemming! I found the center of the tea towel by folding the towel in half and that's where I place the first red stripe. To make the stripes, I used two strands of red embroidery floss. I attached it to one end of the strand I wanted to replace in the tea towel, then pull it through the fabric. To attach, I gently pulled the strand to be replaced by just a tad, in order to have a place to attach the red floss. I found making a stitch in two directions through the little end of the strand was enough to hold while I pulled the embroidery floss through the fabric. To pull the floss through, I followed the strand all the way to the other end of the fabric and gently pull that strand until it pulled the floss all the way through the towel. Then I trimmed the ends of the floss even with the edge. Next I counted over 4 strands and repeated the process. If the floss detaches you can weave the floss through the fabric, but you might go blind! Or maybe you could just find some striped fabric, but where is the fun in that?
Subscribe to:
Comments (Atom)
-
Miniature Garbage Can Tutorial Everyone needs to know how to make a garbage can. Right? Gather up: 1. Some ribbed...
-
The Mice have been very busy making baskets lately. They have even opened an Etsy store https://www.etsy.com/shop/AnimalsMadeOfWool?ref=sim...
-
Mother is cleaning up the kitchen after fixing a cheese platter for the family. She gets a surprise!


